
[vc_row][vc_column][vc_column_text uncode_shortcode_id=”191212″]
Now Supports C4D up to version R2023!
for Version v21-26 enter the Maxon “profile ID” (=”userID”) please instead of a c4d serial
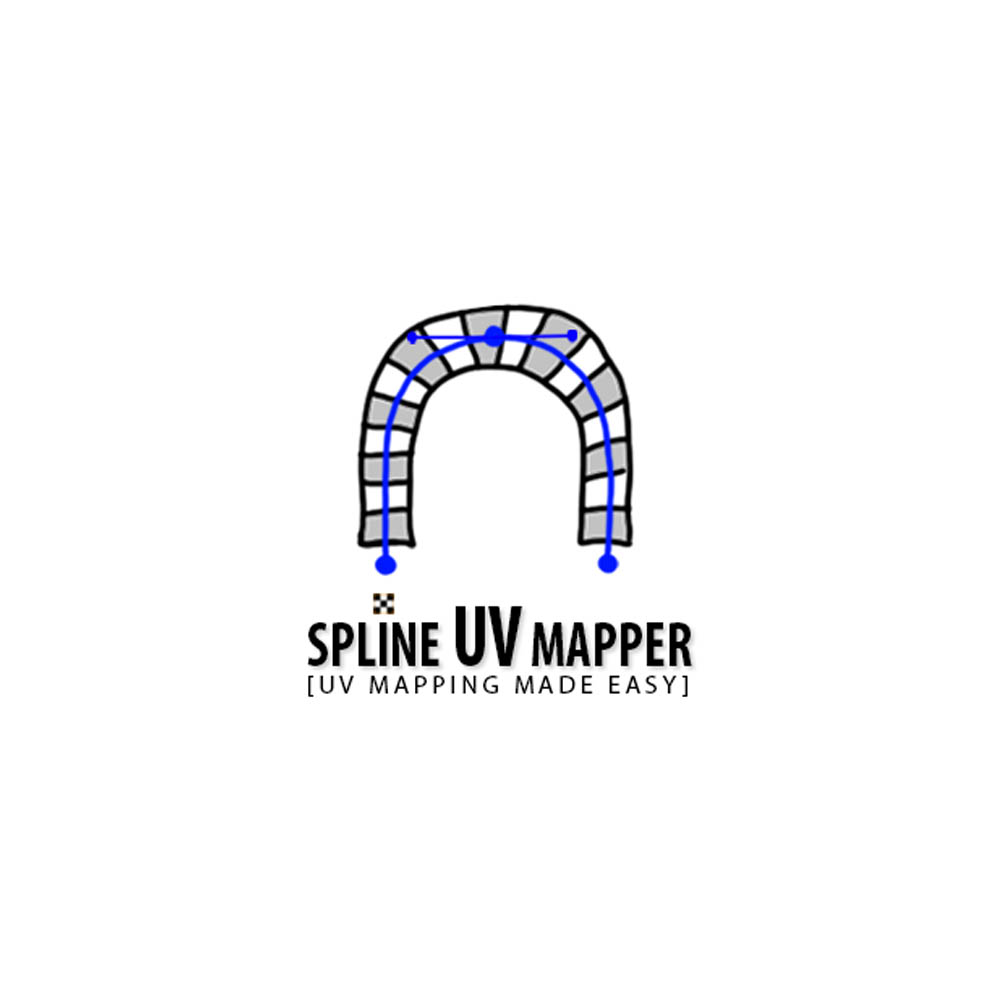
With the Spline|UV-Mapping plugin for MAXON CINEMA 4D you can create UV-coordinates for any mesh simple and fast. This will allow you to use UV-mapping on meshes that were created with 3D-scanners, VDB meshing tools, or similar techniques. The U-coordinates are placed along a spline object you define; the V-coordinates can be set by spherical or planar projection.
Simply right click on the object you want to edit and select the “Spline UV-Mapping” tag from the context menu. Create a spline object that follows the shape of your object and drag & drop this spline object into the plugin tag. UV-coordinates will be created based on the shape of this spline and it’s rotation.
The created UV-coordinates are stored in an UVW-tag. After you have created the UVs you can simply delete the plugin tag and hand your mesh over to the texturing, animation or rendering pipeline. When the Spline UV-Mapping plugin is applied all texture tags of your edited object will automatically switch their projection mode to “UVW Mapping”.
“Tag”-Tab
Spline
Link your spline object here. The shape of the spline object is the most important parameter of this plugin. Adjust your spline to get the best results. The created U-coordinates are set based on the position of the nearest point on this spline object.
Uniform
When this parameter is enabled the spline sampling points are distributed uniformly across the spline.
Use Spline Intermediate Points
If this parameter is disabled the plugin will sample the “perfect” spline shape. When you enable the parameter the plugin will sample the spline you see in the view port. This spline’s shape depends on spline’s “Intermediate Points” mode.
Force High Quality
When the “Uniform” parameter is disabled but “Use Spline Intermediate Points” is enabled this may result in too few samples in certain areas of the spline. To get good results anyway enable this parameter. “Force High Quality” will increase the calculation time.
Selection Tag
A selection tag of the edited object can be used to limit the effect of the plugin to the specific selection
Invert Selection
This inverts the selection defined by the linked selection tag.
UVW Tag
A UVW tag of the edited object can be linked. Only the data of this tag will be changed.
Projection Type
Let’s you choose which method is used to created the V-coordinates. If you set the projection type to “Sphere” a spherical mapping is used. This is the appropriate method for tube-like meshes like limbs or arcs. For flat geometry like streets use the “Line” mode. This mode will create the V-coordinate based on the distance of the vertex to the spline.
Size
In the projection type “Line” this parameter let’s you scale the created V-coordinates.
Switch UV
Exchanges the created U and V-coordinates after their creation.
Invert U
Inverts the U-coordinate.
Invert V
Inverts the V-coordinate.
Apply
Press this button to force the execution of the plugin.
Auto Update
The plugin will be executed automatically when the Spline UV-Mapping tag, the edited object or the spline object are changed.
“Knots”-Tab
Knots are points along your spline object that allow you to adjust the U-coordinate. You can simply set an offset for each knot in the left slider column. In the right slider column you can freely place the position of a knot along your spline object.
Knot Count
Let’s you define the number of knots. The minimum number is three, the maximum knot count is ten.
Draw Knots
If enabled the knots are drawn in the editor as white circles.
Radius
This is the radius that is used to draw the knots in the editor.
Reset
This button resets the offset for all knots to zero.
Auto Align
Press this button to distribute all knots uniformly along the spline object.[/vc_column_text][/vc_column][/vc_row][vc_row row_height_percent=”0″ override_padding=”yes” h_padding=”2″ top_padding=”2″ bottom_padding=”2″ overlay_alpha=”50″ gutter_size=”3″ column_width_percent=”100″ shift_y=”0″ z_index=”0″][vc_column column_width_percent=”100″ align_horizontal=”align_center” gutter_size=”4″ overlay_alpha=”50″ shift_x=”0″ shift_y=”0″ shift_y_down=”0″ z_index=”0″ medium_width=”0″ mobile_width=”0″ width=”1/1″][vc_row_inner][vc_column_inner column_width_use_pixel=”yes” align_horizontal=”align_center” gutter_size=”2″ overlay_alpha=”50″ shift_x=”0″ shift_y=”0″ shift_y_down=”0″ z_index=”0″ medium_width=”0″ mobile_width=”0″ width=”1/1″ column_width_pixel=”600″][vc_custom_heading heading_semantic=”h3″ text_size=”h1″]RELATED PRODUCTS[/vc_custom_heading][/vc_column_inner][/vc_row_inner][uncode_index el_id=”index-325548652″ index_type=”carousel” loop=”size:10|order_by:rand|post_type:product|tax_query:71″ carousel_lg=”4″ carousel_md=”2″ carousel_sm=”1″ thumb_size=”one-one” gutter_size=”4″ product_items=”title,media|featured|onpost|poster|hide-sale|enhanced-atc,price|default” portfolio_items=”title,media|featured|onpost|original” carousel_interval=”5000″ carousel_navspeed=”400″ carousel_loop=”yes” carousel_dots=”yes” carousel_dots_space=”yes” carousel_dots_mobile=”yes” stage_padding=”0″ single_overlay_opacity=”1″ single_overlay_anim=”no” single_h_align=”center” single_padding=”1″ single_title_semantic=”h4″ single_title_dimension=”h4″ single_title_weight=”600″ single_border=”yes” single_css_animation=”zoom-in” single_animation_delay=”200″ single_animation_first=”yes” offset=”10″][/vc_column][/vc_row]
![Rhino.IO-v2 [R19-R2023]](https://copy.3dtools.info/wp-content/uploads/2012/03/rhinoio-300x300.jpg)
![Q-PlaneTrees BUNDLE 1+2+3 [432 tree models]](https://copy.3dtools.info/wp-content/uploads/2019/08/burton1.effectsResult_WEB-300x300.jpg)